Wednesday, 26 February 2014

Use Snipping Tool to Capture Screen Shots in Windows Vista & 7


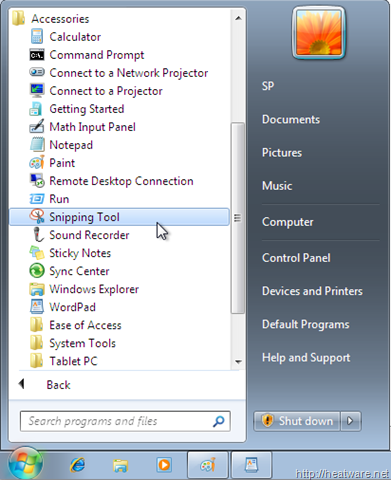
Sometimes the easiest way to make a copy of something is to take a snapshot of your screen-this is what snipping tool does. Use it to save and share. This tool offers clean, simple and user-friendly functionality.


You can capture the following types of snips;


  • Free-Form Snip. Draw any shape around an object with your finger , mouse or tablet pen.
  • Rectangular Snip. Drag the cursor around an object to form a rectangle.
  • Window Snip. Choose a window-like a browser window or a dialog box.
  • Full-Screen Snip. Capture the entire scree.
Capture a Snip

In Snipping tool, tap or click the arrow next to the New button, choose the kind of snip you want, and then pick the area of your screen that you want to capture. The snip is automatically copied to the Snipping Tool Window.

Save a Snip

  1. After you capture a snip, tap or click the Save Snip button.
  2. In the Save As dialog box, enter a file name, location, and file type, and then tap or click Save.
Share a Snip

After you capture a snip, tap or click the arrow next to the Send Snip button, and then choose whether you'd like to send the snip in the body of your email or as an attachment.


Tuesday, 25 February 2014

HIDE YOUR HARDDISK DRIVES IN WINDOWS XP OR 7

Dear Readers,
Assalamu'alaikum,

This tutorial will clear you how to Hide Drives in WINDOWS XP OR 7 By Using Windows Registry Editor

WINDOWS REGISTRY EDITOR IS A DATABASE THAT STORES CONFIGURATION SETTINGS AND OPTIONS ON MICROSOFT WINDOWS OPERATING SYSTEM & FIRST INTRODUCED IN WINDOWS 3.1. CAUTIOUSLY WORK IN REGISTRY EDITOR BECAUSE RE-INSTALLATION OF THE OPERATING SYSTEM WAS REQUIRED IF THE REGISTRY BECOMES CORRUPTED ]

By using this tip, you will only hide Drive from being displayed however applications , Run Box & command prompt will still have access to it.

Now, in this Example we will learn to hide any Drive from My Computer.

OPEN REGISTRY EDITOR

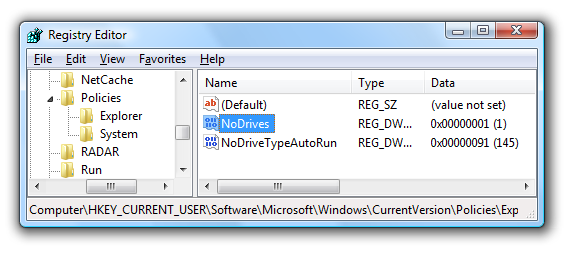
Open Registry Editor by Typing REGEDIT.EXE in search box (windows7) or Run Box (WindowsXP) and then browse down to the following key;

HKEY_CURRENT_USER\SOFTWARE\MICROSOFT\WINDOWS\CURRENT VERSION\POLICIES\EXPLORER

Here you will see two panes left pane & Right Pane.

In the Right Pane, Right-Click & Create new DWORD Value Name it NoDrives
and choose value of Decimal or Hexadecimal from the list below and close the Registry Editor Program.

Below is the list of the values you'll want to enter for a few different drive letters.


Drive LetterDecimalHex
A11
B22
C44
D88
E1610
F3220
G6440
H12880

NOTE:

In order to see these changes you will have to restart explorer.exe which you can do easily from Task Manager or the longer way by just logging off and back on.


Tuesday, 18 February 2014

Download Videos from Facebook & Youtube


Dear Readers,
Assalamu’alaikum,

If you have been tired by trying all methods for downloading videos from facebook or youtube by installing INTERNET DOWNLOAD MANAGER, FLASH GET & Real player Gold edition but all in vain. Then fellow the below given procedure to successfully download videos from facebook & youtube.

  1. Play  the Video on facebook or youtube that you want to download.
  2. Resume the movie for a while & click on the Address bar of your web browsers window. You will see that all the webadress will be highlighted.
  3. Now Copy that link by right clicking on the Address Bar or By pressing Ctrl+C key from your keyboard.

  4. After successfully copying the address, open new tab on your browser & open the following website www.downvids.net

  1. Here paste your copied address in the web Address field to start downloading your required video & then click on download button. It will shows you your required video downside. 
  2. Click on "Download this video" button.

  3. Your Video will begin to play in a new browser window. You just need to Right-Click on that Video & Click on “Save Video” Option.
  4. Save Video on your desired location.


It’s Done.


Thursday, 13 February 2014

Using Aero Flip 3D in Windows 7 to move between open programs

Windows 7 Aero Flip 3D

With Aeroflip 3D, You can quickly preview All of your open windows (for example open files, folders and documents) without clicking the taskbar. Flip 3D displays your open windows in a stack. At the top of the stack, you shall see one open window. To see other windows, you can flip through the stack.


To Switch windows using Flip 3D

1. Press Ctrl+Windows logo key+Tab.
2.Press Tab to move through the windows. (You can also press Right Arrow or Down Arrow to move forward on window, or press left Arrow or Up Arrow to move backward one window).

Tip

One can also move through open windows by pressing the Windows Logo key + Tab and holding down the Windows logo key. Press Tab until the window you want is at the front of the stack, and then release the Windows Log key.

Flip 3D is part of the Aero Experience. If your computer does not support Aero, or if you are using a theme other than a windows 7 theme, you can view the open programs and windows on your computer by pressing Alt+Tab.

Saturday, 8 February 2014

Make you Signatures Online !!!!


Now you can create your signatures online. use the below mentioned website to create free signatures for E-Mail, your blogs and for your documents.


IT'S SO EASY

1.TYPE YOUR TEXT

2.SELECT STYLE

3.SELECT SIZE

4.SELECT SLOPE

5.DOWNLOAD & ENJOY


LINK IS GIVEN BELOW...

MYLIVESIGNATURE

Windows XP Service Pack 3 Package for IT Professionals and Developers


UPGRADE TO SERVICE PACK 3 OF WINDOWS XP

Dear Reader,
Assalamu'alaikum


Technology is updating day by time. It's need of time also to update our PC with such changes. Many Microsoft OS (operating system) Lovers are still using old Windows XP (including me) and MS Office 2003. But Microsoft has announced to stop provide online new support & updates related to MS Office 2003 & Windows XP Ends April 2014.

This Article will Explain you the method of upgrading your current operating system of Windows to Service Pack 3 (if you are still using SP1 or SP2).

Important: Windows XP Service Pack 3 won't install if your computer is running on the 64-bit version of windows.

[To determine what version of windows you are using, 

1. Open "SYSTEM Properties " Dialog Box By Right-Clicking on My Computer & click on Properties.
2.Click the General Tab.
     For a 64-bit version Operating System, Windows XP Professional X64 Edition Version <year> appears.
     For a 32-bit version Operating System, Windows XP Professional Version <year> appears.]

[To check what Service pack is install on your PC,

1. Click Start

2. Type the following command in the RUN Box
     winver

A dialog box displays the version of Windows and service packs that are currently installed on your computer.]


After making the above confirmations, click on link given below to download the Microsoft Windows XP Service Pack 3

DOWNLOAD WINDOWS XP SERVICE PACK 3